Indoor Container Vegetable Gardening – Seed to Bed
Growing Vegetables Indoors
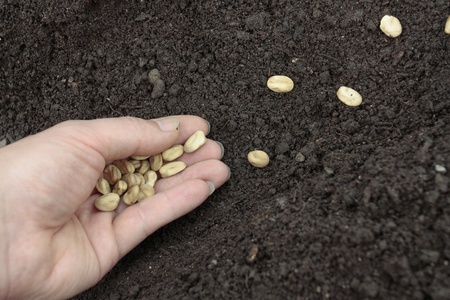
Starting plants from seeds, while seemingly complicated, is one of the most common and rewarding types of gardening. There are a few steps that need to be learned, and a small amount of equipment to buy, to be a successful seed gardener. As a result, indoor container vegetable gardening is an established practice that has many benefits.
Plants that flower and produce buds are started from seed.
Seeds provide a great option for gardening in areas where the growing season is shorter due to its particular climate. Some vegetables are adapted to areas that have a long or longer growing season and they cannot be grown in places where soils are not warm enough for long enough to adequately complete the growing cycle. You must be able to make sure that whatever you decide to plant can be started from seeds, transplanted to your outdoor garden, grown to maturity, and harvested before weather prevents it.
Not all vegetables should be started from seeds. Cool season plants and plants that grow very quickly, such as squash and beans, do better when planted directly outside, also known as direct seeding.
It is advisable to begin your indoor vegetable gardening endeavors by beginning with only a few varieties. This makes things less complicated. One thing you will find is that all seeds are not the same. Different varieties have different requirements related to germination, light required, and growing care. If you try too many things at first it is very easy to get confused, but if you stick to a few chosen plants and learn the requirements for those plants thoroughly, your chances of being successful will be much higher.
The Benefits of Seeds
There are a number of reasons why it makes sense to start gardening from seed. Among these are:
- Starting your plants from inside seeding is often preferable to direct seeding. There are a lot of things that can go wrong in direct seeding that can be controlled to some extent if you start your plants inside. Container vegetable gardening can be used to get a start on the growing season.
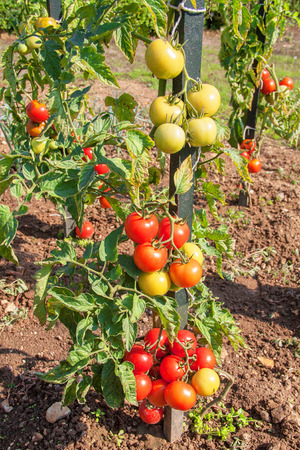
Tomato Plant Growing Vertically with a Stake Support The conditions outside may not allow planting because the growing season is too short for annual plants like peppers and tomatoes to grow to the full maturity required for harvest, but inside you can take as much time as you need and grow anytime. It allows you to begin your vegetable garden earlier in the season. You can grow your vegetables from seed to harvest, beginning inside in climate controlled conditions, and ultimately planting your seedlings in your outside garden beds or containers.
- While vegetables are often grown from store bought plants and can save time, they generally do not give you nearly as many choices or varieties as those you can find from a seed catalogue. It’s a cheaper alternative than buying your plants. It allows you to plant more varieties, more often than buying plants because you are spending less money on each planting.
- Starting plants from seed indoors doesn’t need to take up much space. You will need to devote an area inside your home to it, but it doesn’t need to be expansive or overly large or conspicuous. And when you do reach the point where you are transplanting to the outside the space required then is also relatively small. Larger containers that lend themselves to small areas can be used to grow outside, and you do not need a larger area outside to grow most vegetables. Using a trellis or a wire against a backyard fence allows you to grow vertically as well.
Starting Your Seeds Indoors
As with most endeavors, seed planting is a process that works best when certain steps are followed. There will be variations depending on what you are planting, but you will always want to be following these basics steps:
- Decide What You Wish to Plant and Select Your Seeds
As noted above, as you begin to venture into seed planting it is best to not attempt too much too soon. Starting with two or three varieties until you get the basics down is much better than trying to manage a lot all at once.When you purchase seeds they will come in a packet. The packet will contain useful and essential information on planting. Be sure to study each packet you buy because all plants have different characteristics regarding the amount of light they need, when to plant, and the number of days to harvest. The number of days may be from the time the seeds are sown, or it could be from the time they are transplanted outside…this is why it is essential to read the instructions on the seed packet closely.You can buy seed packets at your local garden center, or purchase from one of many online retailers. The advantage of buying online is the ease of shopping as well as the variety you have to choose from. The advantage of the local garden center is that whatever they do carry has probably been proven to grow in your area. Don’t purchase more seed than you are going to need. Seed packets should be good for 2-3 years but the older the packet is the lower the percentage of seeds you can reasonably expect to germinate. If your packet contains more seeds than you end up planting you can store the excess by putting them in an air tight container and storing in the refrigerator.
- Select Your Containers and Materials
It is possible to grow seeds indoors in a sunny, south facing window, but a better choice, especially if you are beginning, is to invest in a seed starting kit and some form of lighting system.
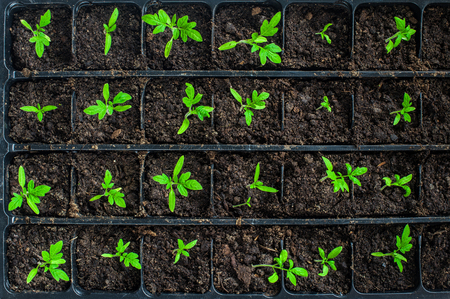
They are relatively inexpensive and you can control the amount and intensity of the light you give to your seeds.The seed starting kit will consist of a tray with uniform divided sections in which you plant individual seeds. The sections are designed to be the right size for growing seeds. The uniformity brings simplicity and the tray form allows much easier movement. A kit will also most likely include a clear lid for holding in humidity and helping the germination process.
- Prepare Your Planting Mix
Select a potting mix, preferably one that you purchase online or through a garden center. You can make your own mix, but if you are starting out it is easier and less risky to buy it. If you do make your own, do not include any soil from your garden. The reason for this is that there is potential for bacteria and other disease to follow routine garden soil and damage your new seed plantings. You want your planting mix to be moist and crumbly, not dry and not waterlogged. Before planting, take a bucket of your mix and moisten it to the point of getting it damp. Then put the mix in your containers, making sure it is firmly packed. You do not need to worry about fertilizing the mix until the seeds germinate.
- Watering
As noted above, keep your seed containers moist but not excessively wet. Check them a few times a day to see that they do not dry out. Watering from the bottom is preferable. Watering from the top can dampen the leaves, which can lead to disease problems. If you do choose to water from the top, use a spray mister so that the water can be gently applied without disrupting the planting mix.
To water from the bottom, set your containers in a tray and fill the tray about half to the top with water. The plants will absorb it from the bottom. When the top of the mix is damp you can remove the containers or empty the water from the tray.
- Germination
Your seeds need to germinate before they can grow. Germination occurs when the seed embryo emerges. To encourage this process you will ideally have a source of warmth to give your containers. What you are looking for is a gentle warmth, not a searing heat. Placing your containers or tray on a heating pad on a low setting will work, as well as setting them on top of a working refrigerator. Light is not necessary for germination unless the packet indicates so. There are some plants where light is needed. A growth sprout of about half an inch indicates the seed has germinated and it is now ready to be put under light at room temperature and away from the additional source of warmth.
- Lighting
Lighting is critical for growing plants from seed. South facing windows may work, but it is usually better to grow seeds with an artificial light source using florescent lights. Generally 15-16 hours of light are necessary for optimum growth. This is where you need to follow the instructions on the seed packet because there will be different requirements for different vegetables and varieties. One suggestion is to use a shop light which can be suspended via a chain and S hooks. This allows you to raise the light as the seedlings emerge and get taller. If you wish you can purchase a timer to coordinate the off and on for your light, but that is not necessary as long as you remember to set it manually.
- Fertilizer
You do not need to worry about fertilizing until after your seeds have germinated, and then perhaps a week or two after they do. Use a water soluble fertilizer once or twice a week thereafter to keep the plants fed.
- Moving to a Larger Container
As your seeds germinate and the seedlings grow they will eventually get too large for the original containers. At this point you will want to move your small plants to larger containers and then most likely re use your old original containers for a new round of seeds. Plastic cups work well as an “intermediate” container. You will no longer need the individual cell pack type of container. You want to carefully remove your plant from the original container, gently removing the roots with as little disruption to them as possible. When you put the plant into the new container, dig out an area with a pencil or popsicle stick, put the plant in down to about an inch from the bottom, and then fill in around it with the soil by spreading with your pencil or stick. Pack loosely enough for oxygen to breath through.
- Transplanting Outside
Assuming your vegetable plants continue to grow inside they are going to eventually be ready to move outside. Do not try to do this in one process. Your plant has been inside and not exposed to the sun, wind, rain or the other elements that affect outside plants. The typical way this is done is called “hardening off”. It entails giving your plant increased exposure each day to outside conditions without leaving it outside a full day. You want to break them in easy, in the shade. Then gradually give them more time and exposure to sunlight. Bring the plants in at night and after about two weeks you should be able to leave them outside, and then plant them. It is best to do your actual transplant on a cloudy day to reduce the stress on the plants. Be sure to plant with an eye towards how much space your vegetable plants will require when they are mature.
Final Thoughts
Once the process has been completed you want to continue to monitor the newly transplanted plants to assure they are adequately watered. And this is a process that can be repeated over and over, providing you with home grown vegetables for your table and maybe your neighbors’ as well!